Basics of WCF
Windows Communication Foundation (WCF) enables applications to
communicate whether they are on the same computer, across the Internet,
or on different application platforms.
The basic tasks to perform are, in order:
A service contract specifies the following:
To define a service contract, create a WCF Service Library project by clicking the File menu and selecting New, Project. In the New Project dialog, on the left-hand side of the dialog expand Visual C# for a C# project. Under the language selected, select WCF and a list of project templates will be displayed on the center section of the dialog. Select WCF Service Library, and type the project name
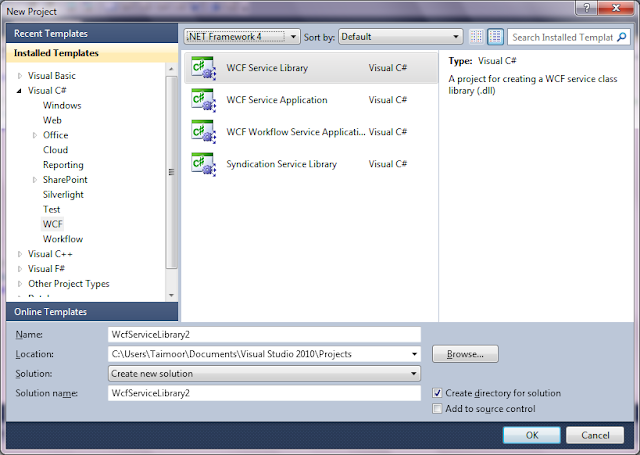
Visual Studio will create the project which contains 3 files: IService1.cs, Service1.cs and App.config. The IService1 file contains a default service contract. The Service1 file contains a default implementation of the service contract. The App.config file contains configuration needed to load the default service with the Visual Studio WCF Service Host.

If you open the IService1.cs, you will find the following code in the file.
using System;
using System.Collections.Generic;
using System.Linq;
using System.Runtime.Serialization;
using System.ServiceModel;
using System.Text;
namespace WcfServiceLibrary2
{
// NOTE: You can use the "Rename" command on the "Refactor" menu to change the interface name "IService1" in both code and config file together.
[ServiceContract]
public interface IService1
{
[OperationContract]
string GetData(int value);
[OperationContract]
CompositeType GetDataUsingDataContract(CompositeType composite);
// TODO: Add your service operations here
}
// Use a data contract as illustrated in the sample below to add composite types to service operations
[DataContract]
public class CompositeType
{
bool boolValue = true;
string stringValue = "Hello ";
[DataMember]
public bool BoolValue
{
get { return boolValue; }
set { boolValue = value; }
}
[DataMember]
public string StringValue
{
get { return stringValue; }
set { stringValue = value; }
}
}
}
Notice the IService1 interface is marked with the ServiceContractAttribute attribute. This attribute defines a namespace that is used to disambiguate the contract name. Each operation (method) is marked with the OperationContractAttribute attribute.
Service1.cs implements the service interface. You will find the following code in this file.
using System;
using System.Collections.Generic;
using System.Linq;
using System.Runtime.Serialization;
using System.ServiceModel;
using System.Text;
namespace WcfServiceLibrary1
{
// NOTE: You can use the "Rename" command on the "Refactor" menu to change the class name "Service1" in both code and config file together.
public class Service1 : IService1
{
public string GetData(int value)
{
return string.Format("You entered: {0}", value);
}
public CompositeType GetDataUsingDataContract(CompositeType composite)
{
if (composite == null)
{
throw new ArgumentNullException("composite");
}
if (composite.BoolValue)
{
composite.StringValue += "Suffix";
}
return composite;
}
}
}
Now the service contract is created and implemented. Build the solution to ensure there are no compilation errors and then proceed to host and run a basic WCF Service.

To host a WCF service in a console application, do the following steps:

Add a reference of the WcfServiceLibrary project to the ConsoleApplication1 project.

Add a reference of System.ServiceModel to the GettingStartedHost project.

To host the service, Open the Program.cs and add the following code.
// program.cs
using System;
using System.Collections.Generic;
using System.Linq;
using System.Text;
using System.ServiceModel;
using WcfServiceLibrary1;
using System.ServiceModel.Description;
namespace ConsoleApplication1
{
class Program
{
static void Main(string[] args)
{
// Step 1 Create a URI to serve as the base address.
Uri baseAddress = new Uri("http://localhost:8000/MyServiceStarted/");
// Step 2 Create a ServiceHost instance
ServiceHost selfHost = new ServiceHost(typeof(Service1), baseAddress);
try
{
// Step 3 Add a service endpoint.
selfHost.AddServiceEndpoint(typeof(IService1), new WSHttpBinding(), "Service1");
// Step 4 Enable metadata exchange.
ServiceMetadataBehavior smb = new ServiceMetadataBehavior();
smb.HttpGetEnabled = true;
selfHost.Description.Behaviors.Add(smb);
// Step 5 Start the service.
selfHost.Open();
Console.WriteLine("The service is ready.");
Console.WriteLine("Press <ENTER> to terminate service.");
Console.WriteLine();
Console.ReadLine();
// Close the ServiceHostBase to shutdown the service.
selfHost.Close();
}
catch (CommunicationException ce)
{
Console.WriteLine("An exception occurred: {0}", ce.Message);
selfHost.Abort();
}
}
}
}
To verify the service is working, run the console application.

Next steps are to create, configure and use WCF client and we will see these steps in the next post. Till Den Happy Programming... :)
The basic tasks to perform are, in order:
-
Define the service contract. A service contract specifies the
signature of a service, the data it exchanges, and other contractually
required data.
-
Implement the contract. To implement a service contract, create a
class that implements the contract and specify custom behaviors that
the runtime should have.
-
Configure the service by specifying endpoints and other behavior information.
-
Host the service.
- Build a client application.
A service contract specifies the following:
-
The operations a contract exposes.
-
The signature of the operations in terms of messages exchanged.
-
The data types of these messages.
-
The location of the operations.
-
The specific protocols and serialization formats that are used to support successful communication with the service.
CreateOrder
operation that accepts an input of order information types and returns
success or failure information, including an order identifier. It might
also have a GetOrderStatus operation that accepts an order identifier and returns order status information. A service contract of this sort would specify:-
That the purchase order contract consisted of
CreateOrderandGetOrderStatusoperations. -
That the operations have specified input messages and output messages.
-
The data that these messages can carry.
-
Categorical statements about the communication infrastructure necessary
to successfully process the messages. For example, these details include
whether and what forms of security are required to establish successful
communication.
To define a service contract, create a WCF Service Library project by clicking the File menu and selecting New, Project. In the New Project dialog, on the left-hand side of the dialog expand Visual C# for a C# project. Under the language selected, select WCF and a list of project templates will be displayed on the center section of the dialog. Select WCF Service Library, and type the project name

Visual Studio will create the project which contains 3 files: IService1.cs, Service1.cs and App.config. The IService1 file contains a default service contract. The Service1 file contains a default implementation of the service contract. The App.config file contains configuration needed to load the default service with the Visual Studio WCF Service Host.

If you open the IService1.cs, you will find the following code in the file.
using System;
using System.Collections.Generic;
using System.Linq;
using System.Runtime.Serialization;
using System.ServiceModel;
using System.Text;
namespace WcfServiceLibrary2
{
// NOTE: You can use the "Rename" command on the "Refactor" menu to change the interface name "IService1" in both code and config file together.
[ServiceContract]
public interface IService1
{
[OperationContract]
string GetData(int value);
[OperationContract]
CompositeType GetDataUsingDataContract(CompositeType composite);
// TODO: Add your service operations here
}
// Use a data contract as illustrated in the sample below to add composite types to service operations
[DataContract]
public class CompositeType
{
bool boolValue = true;
string stringValue = "Hello ";
[DataMember]
public bool BoolValue
{
get { return boolValue; }
set { boolValue = value; }
}
[DataMember]
public string StringValue
{
get { return stringValue; }
set { stringValue = value; }
}
}
}
Notice the IService1 interface is marked with the ServiceContractAttribute attribute. This attribute defines a namespace that is used to disambiguate the contract name. Each operation (method) is marked with the OperationContractAttribute attribute.
Service1.cs implements the service interface. You will find the following code in this file.
using System;
using System.Collections.Generic;
using System.Linq;
using System.Runtime.Serialization;
using System.ServiceModel;
using System.Text;
namespace WcfServiceLibrary1
{
// NOTE: You can use the "Rename" command on the "Refactor" menu to change the class name "Service1" in both code and config file together.
public class Service1 : IService1
{
public string GetData(int value)
{
return string.Format("You entered: {0}", value);
}
public CompositeType GetDataUsingDataContract(CompositeType composite)
{
if (composite == null)
{
throw new ArgumentNullException("composite");
}
if (composite.BoolValue)
{
composite.StringValue += "Suffix";
}
return composite;
}
}
}
Now the service contract is created and implemented. Build the solution to ensure there are no compilation errors and then proceed to host and run a basic WCF Service.

To host a WCF service in a console application, do the following steps:
-
Create a console application project to host the service.
-
Create a service host for the service.
-
Enable metadata exchange.
- Open the service host.

Add a reference of the WcfServiceLibrary project to the ConsoleApplication1 project.

Add a reference of System.ServiceModel to the GettingStartedHost project.

To host the service, Open the Program.cs and add the following code.
// program.cs
using System;
using System.Collections.Generic;
using System.Linq;
using System.Text;
using System.ServiceModel;
using WcfServiceLibrary1;
using System.ServiceModel.Description;
namespace ConsoleApplication1
{
class Program
{
static void Main(string[] args)
{
// Step 1 Create a URI to serve as the base address.
Uri baseAddress = new Uri("http://localhost:8000/MyServiceStarted/");
// Step 2 Create a ServiceHost instance
ServiceHost selfHost = new ServiceHost(typeof(Service1), baseAddress);
try
{
// Step 3 Add a service endpoint.
selfHost.AddServiceEndpoint(typeof(IService1), new WSHttpBinding(), "Service1");
// Step 4 Enable metadata exchange.
ServiceMetadataBehavior smb = new ServiceMetadataBehavior();
smb.HttpGetEnabled = true;
selfHost.Description.Behaviors.Add(smb);
// Step 5 Start the service.
selfHost.Open();
Console.WriteLine("The service is ready.");
Console.WriteLine("Press <ENTER> to terminate service.");
Console.WriteLine();
Console.ReadLine();
// Close the ServiceHostBase to shutdown the service.
selfHost.Close();
}
catch (CommunicationException ce)
{
Console.WriteLine("An exception occurred: {0}", ce.Message);
selfHost.Abort();
}
}
}
}
To verify the service is working, run the console application.

Next steps are to create, configure and use WCF client and we will see these steps in the next post. Till Den Happy Programming... :)

Comments
Post a Comment